Here I will walk you through how I set up buttons to replace sheet tabs with two different methods—one using shapes with hyperlinks and the other using command buttons and macros. See a preview of the shape with hyperlinks below.
Using a Shape as a Button Option
Using a shape as a button is the easiest method to link to a tab and requires just a few simple steps. See a preview of the steps taken to use the shapes with hyperlinks method below. Step 1. Insert a Shape Step 2. Edit the Button Step 3. Linking the Button
Step 1. Insert a Shape
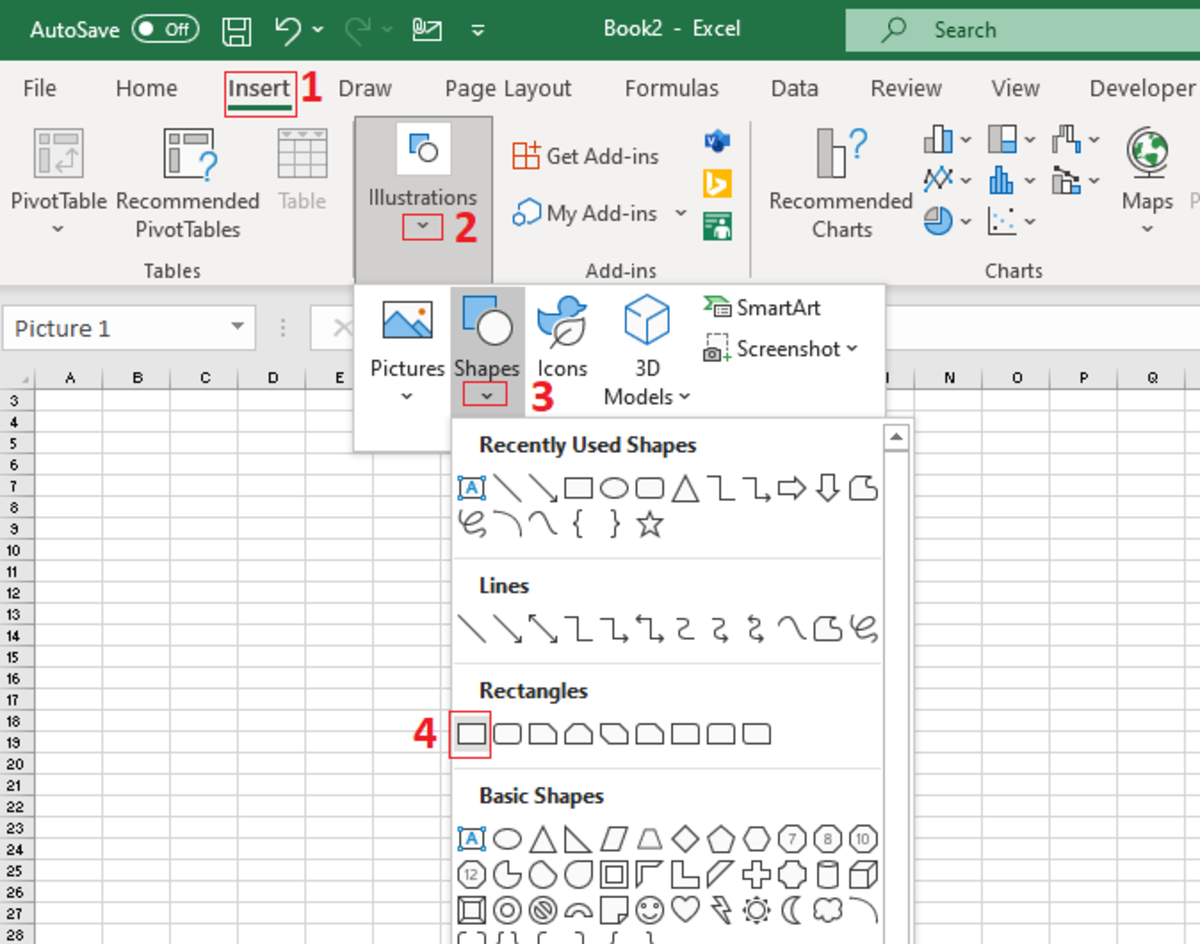
To create a button from a shape, you must be in the insert tab, then click on the illustrations button. Next, click on shapes and find the shape that you would like to use for a button. I’m using a standard rectangle. Add the button by tracing the shape to size with the cursor. Make adjustments to the size of the button by pulling at the spheres on the corners and sides of the shape.
Step 2. Edit the Button
Add text to the shape by right-clicking on and selecting edit text from the drop-down menu. This will put the cursor into the shape where you can add text and format it appropriately. As you will see later on, I have created a button for every tab.
Step 3. Linking the Button
To begin linking your newly created button, right-click on the button and select the link from the drop-down menu. The insert hyperlink window will appear. Click on the “place in the document” option and then select the sheet that you want to assign to the button. Lastly, add the location where you would like the cursor to end up after the operation has been completed, or leave it blank. After this step, the button should be operational.
Using a Command Button Option
Learn how to use a command button to open an Excel worksheet in this section. Using a command button and creating a macro to open a tab requires a little more skill. See a preview of the steps taken to use this method below. Step 1. Add a Command Button Step 2. Assign a Macro Step 3. Add the Macro Code Step 4. Editing the Button Step 5. Disable Design Mode Step 6. Save the Document As Macro-Enabled
Step 1. Add a Command Button
To add a command button, make sure that you have the developer tab enabled in Excel. With the developer tab open, click on insert, then choose the command button option. Next, draw the shape of the button with your cursor.
Step 2. Assign a Macro
After the assign macro button window appears, click on the “new” button to add a macro code to open a sheet.
Step 3. Add the Macro Code
Next, add the text below with the sheet that you want to be directed to in quotations. The text must be added between the line that starts with sub and the line that starts with end sub like in the example below. Sub must contain the name of the macro followed by an opening and closing parenthesis. Sub Button1_Click() ThisWorkbook.Sheets(“Sheet1”).Activate End Sub
Step 4. Editing the Button
After the button is created, you can change its size by pulling the spheres on each corner and side. The text can be changed by right-clicking on the button in design mode and selecting the command button object. This will open up the edit option, which must also be clicked. Changing other properties of the button, like the size of the text, is tricky. Right-clicking on the button and choosing the properties option from the drop-down will give these font options that are outlined in red below. There are also dozens of other settings in properties that allow you to manipulate the button appearance.
Step 5. Disable Design Mode
To be able to test the button, make sure that you click on the design mode button to disable it.
Step 6. Save the Document as Macro-Enabled
Make sure to save the document as a macro-enabled workbook, or the macros that you create will not work after the document is closed. This content is accurate and true to the best of the author’s knowledge and is not meant to substitute for formal and individualized advice from a qualified professional. © 2021 Joshua Crowder


